
Do you need to export your expenses to an accounting program without a direct integration? Or do you simply want to create an Excel file for your own reporting needs? In these cases, you can set up a custom export format in Declaree.
Step 1: Navigate to Export Formats
-
Go to Configuration → Import & Export
-
Click Add to create a new export format.
Step 2: Define File Settings
In the first tab, you’ll define the basics:
-
File type: Choose from Excel, CSV, TXT, or XML.
-
File name: Enter a name for your export file.
CSV File Options
If you select CSV, additional settings become available:
-
Separator: Select the character used between fields (comma, semicolon, etc.).
-
Decimal separator: Choose how decimals are displayed.
-
Line ending format: Define how new lines are handled.
-
Quote all text cells: Ensures text is wrapped in quotation marks, making it easier to import into other programs.
-
Column titles in first row: Add headers for clarity.
-
Separate header row: Useful for journal entries or similar structured exports.
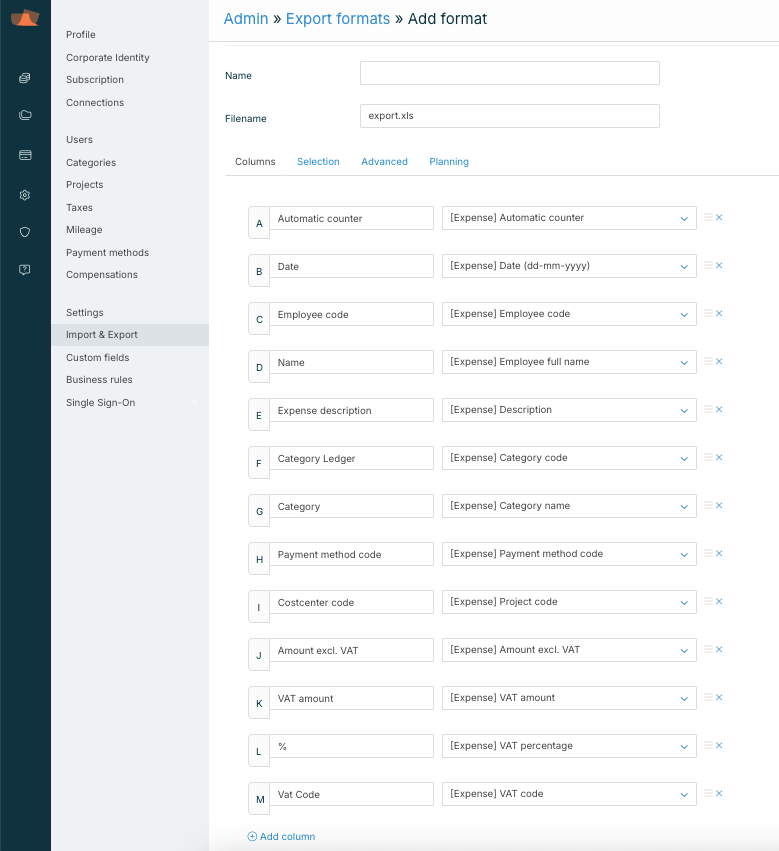
Step 3: Define Data Fields
In the columns tab:
-
Select which data fields from Declaree you want to include.
-
Each data field is linked to a column in your export file.
-
The overview clearly shows how your Declaree data maps to the file structure.
Tip: Start with the minimum set of fields you need. You can always add more later, but a clean, simple export format is easier to manage and reduces errors when importing into other systems.
Step 4: Choose Expense Types
In the Selection and Advanced tab:
-
Choose which expense types to include.
-
If you don’t select any, all expense types will be exported.
-
For mileage expenses, you can choose to export taxed and untaxed amounts in separate rows.
Step 5: Planning Options
With automated exports via SFTP, Declaree can send your data to an FTP account on a schedule you define, saving time and ensuring consistency. The planning option allows you to automate exports instead of running them manually. Once your FTP account is set up, you can follow these steps to plan your export: Schedule Automated Exports via SFTP