
Use the Reports page to find employee reports, review their status and prepare them for accounting or payroll. This guide explains how to manage reports on the web and retrieve your exports.
Note: The views, filters and actions available depend on your permissions and your organization’s settings.
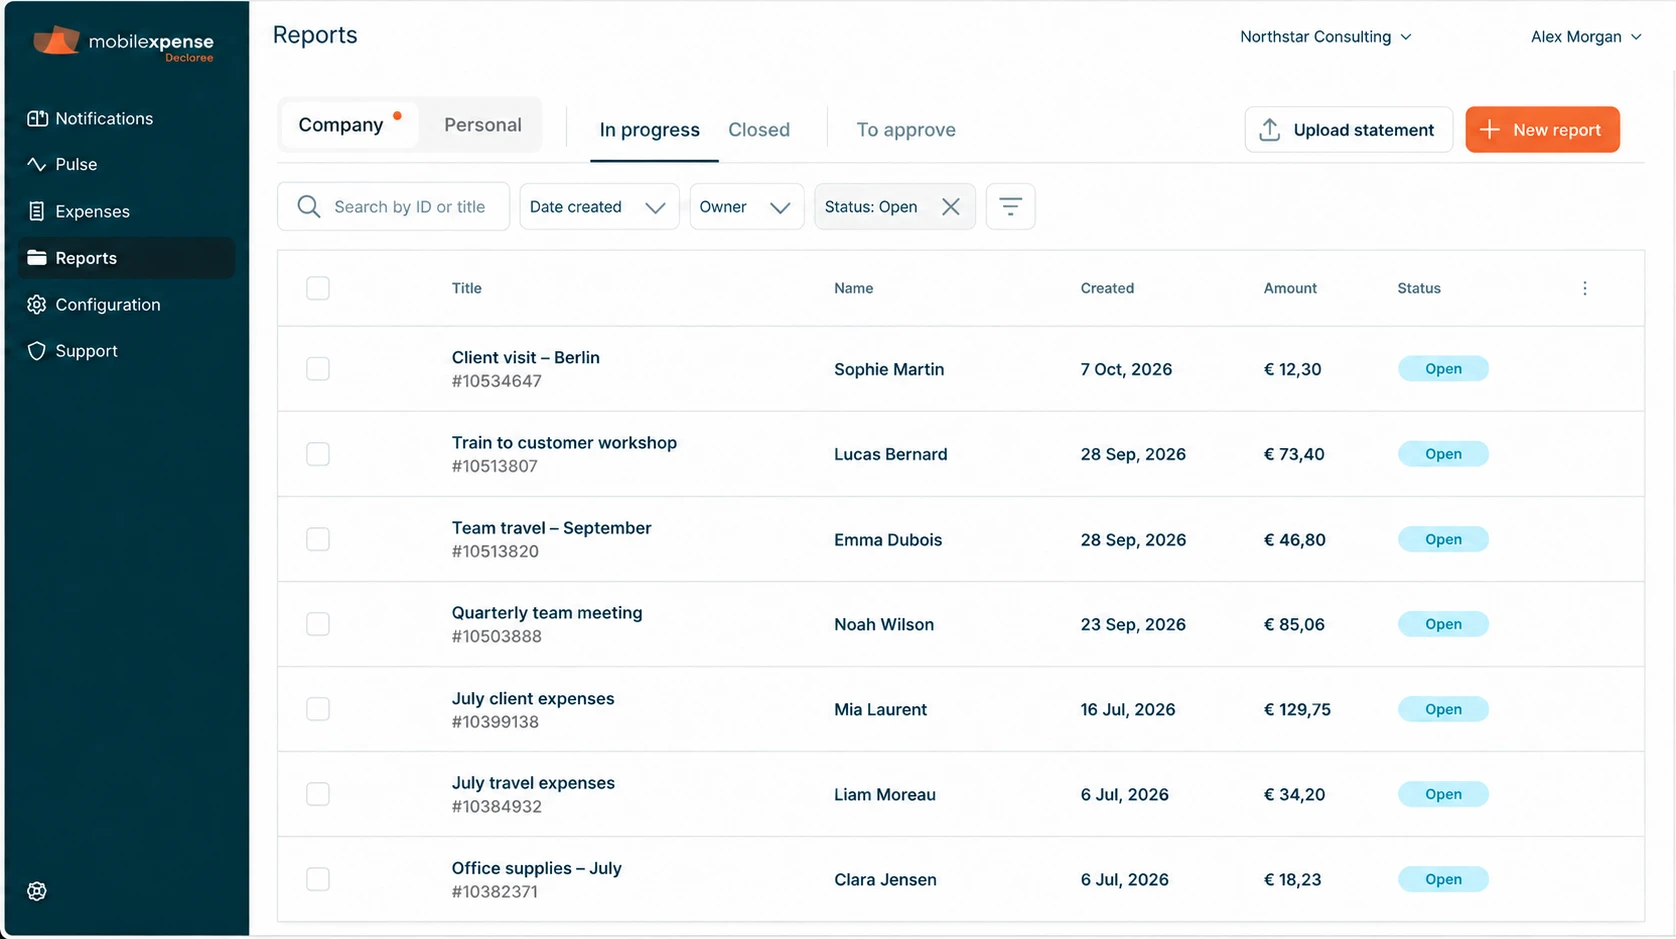
Find the reports you need
Click Reports in the left menu. As an administrator, you can switch between Company for your organization’s reports and Personal for your own reports.
|
View |
What you will find |
|
In progress |
Reports that have not been closed, including reports awaiting approval and reports already approved. |
|
Closed |
Reports that have been finalized and closed in Declaree. |
|
To approve |
Reports awaiting your approval. This view appears if you have approval rights. |
Tip: An approved report remains in In progress until it is closed.
Search and filter reports
-
Use Search by ID or title to find a specific report.
-
Use Date created to choose when the report was created. This filter refers to the report’s creation date, rather than the dates of its expenses.
-
Use Owner to find reports belonging to one employee, or Status to narrow down reports in progress.
-
Open the additional filters button beside the filters to filter by report type, group or card.
You can combine filters. If a report is missing, check the selected view, search text and filters. Use the controls below the list to move between pages or change the number of reports shown.
Choose the details shown in the list
Open the three dots at the right of the table headings to choose your columns. For example, you can show the manager, approval date, reimbursable amount or export information.
Click a sortable column heading to sort the reports shown on the current page. Your choice of visible columns only changes the list; it does not change the contents of an export file.
Review and manage reports
Open a report to review its expenses, receipts and any policy messages before taking action.
To act from the list, tick the checkbox beside a report. The checkbox in the table heading selects all reports on the current page. An action bar appears at the bottom of the screen; check its selection count before continuing.
Available actions depend on the selected reports and your permissions. They can include Approve, Reject, Retract, Export and the options under More.
-
Approve or reject: Follow your organization’s approval process. When rejecting a report, explain what needs to be corrected.
-
More → Checked: Mark eligible reports as reviewed. This is separate from approving or closing them.
-
More → Processed: Finalize eligible reports and move them to Closed.
Note: Closing a report prevents further changes. Check that the report is ready to be finalized before choosing Processed.
Export reports
-
Find the reports you need and tick their checkboxes.
-
Click Export in the action bar at the bottom of the screen.
-
Choose a file format or a connection. The choices depend on your permissions and your organization’s setup.
-
Declaree processes the export in the background. You can continue working while it prepares the result.
What to expect from each export
|
Export option |
Expected result |
Where to retrieve it |
|
CSV and custom exports |
A data file in the selected format. Custom exports use the fields and layout configured for your organization. |
Use the download link in the completion email or the Export Ready notification. |
|
Connections that generate files |
A file or ZIP archive to import into your accounting, payroll or banking software. |
Use the download link provided when the export is ready, then import the file into the receiving system. |
|
Connections that send data directly |
The selected reports are sent to the connected system. A separate download is usually unnecessary. |
Check the completion message and review the result in the connected system. |
Tip: An option listed under Connections may generate a file or send data directly. Check the completion message to see which result applies.
Retrieve a file and check an export
For exports that generate a file, Declaree sends the user who started the export an email with a download link. You can also open Notifications in Declaree and select the relevant Export Ready notification.
The file is ready to download when you receive that confirmation. The initial processing message means your request has been received; it does not confirm that the export succeeded.
To find an export again, go to Configuration → Import & Export → More → Export history. Find the export by its date and format. Use the download button where a file is available, or open the export to view its details.
To see export information alongside reports, enable the Export column using the three dots in the table headings. Hover over an export icon to see the format and export date and time.
Scheduled exports
If your organization uses scheduled exports, Declaree selects reports according to the configured schedule and criteria and delivers the files to the configured SFTP folder. You do not need to select those reports manually. Email confirmations and automatic closing depend on the export settings.
For setup instructions, see the article below.
Schedule Automated Exports via SFTP
Frequently asked questions
Why can’t I find a report?
Check Company or Personal, then In progress or Closed. Clear the search text and review each active filter. An approved report may still be in In progress.
Why is an export option missing?
Select at least one report first. Custom formats must be configured for your organization, and connections must be enabled and connected. Your permissions also determine which options are available.
I started an export but no file downloaded. What should I do?
Wait for the completion message, then check Notifications and the inbox of the account that started the export, including the spam folder. Check Export history for the result. If you used a direct connection, check the receiving system instead of looking for a file.
What if an export fails or only some reports are exported?
Open the failure notification and review the details. For connection exports, the details can identify the affected reports and offer Retry, Copy details and Contact support. Correct the reported issue before retrying the failed reports. Check the receiving system before repeating the full export.
What should I send to Support?
Include your organization name, the report IDs, export format or connection, the approximate date and time, and the error message. Use Copy details if available, or include a screenshot of the message.